[ 목표 ]

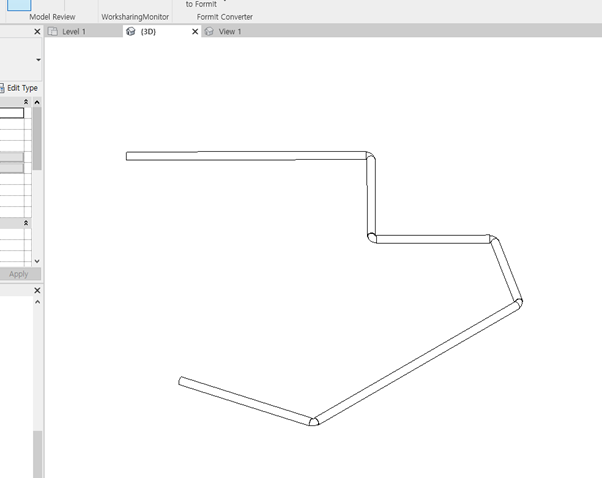
Revit api 를 활요하여 Pipe를 생성하고 Elbow를 이용하여 Pipe Fitting 처리한다.


[ 방법 ] 


1) UIdocument 에서 선택한 modelLine을 가져온다.
2) line에 맞춰 Pipe 생성한다. 
3) 생성된 Pipe 끼리 elbow로 Fitting 시킨다.
4) line 삭제한다.


[Autodesk.Revit.Attributes.Transaction(Autodesk.Revit.Attributes.TransactionMode.Manual)]
    class CreatePipeButton : IExternalCommand
    {

        public Result Execute(ExternalCommandData commandData, ref string message, ElementSet elements)
        {

            App.m_App = commandData.Application;
            UIApplication uiapp = commandData.Application;
            UIDocument uidoc = uiapp.ActiveUIDocument;
            Autodesk.Revit.ApplicationServices.Application app = uiapp.Application;
            Document document = uidoc.Document;

            // 선택한 Line 가져오기
            List<Element> elementlist = GetPipeLine(uidoc, document);

            // Pipe 생성 및 Pipe Fitting
            CreatePipe(uidoc, document, elementlist);
            return Result.Succeeded;
        }


//선택한 개체를 필터링할 수 있는 인터페이스 구현(= An interface that provides the ability to filter objects during a selection operation)
        public class PlanarFacesSelectionFilter : ISelectionFilter
        {
            Document doc = null;
            public PlanarFacesSelectionFilter(Document document)
            {
                doc = document;
            }

            public bool AllowElement(Element element)
            {
                return true;
            }

            public bool AllowReference(Reference refer, XYZ point)
            {
                if (doc.GetElement(refer).GetGeometryObjectFromReference(refer) is PlanarFace)
                {
                    return true;

                }
                return false;
            }
        }

 public List<Element> GetPipeLine(UIDocument uidoc, Document document)
        {
            ISelectionFilter selFilter = new PlanarFacesSelectionFilter(document);
            IList<Reference> references = uidoc.Selection.PickObjects(ObjectType.Element, selFilter, "Select multiple planar faces");
            List<Element> elementlist = new List<Element>();

            foreach (Reference referen in references)
            {
                Element element = uidoc.Document.GetElement(referen);
                elementlist.Add(element);
            }

            return elementlist;
        }

public void CreatePipe(UIDocument uidoc, Document document, List<Element> elementlist)
        {

            // (1) pipe 생성하기

            // 1-1) pipe 생성에 필요한 속성 임의로 가져오기
            PipeType pipeType = new FilteredElementCollector(document).OfClass(typeof(PipeType)).FirstElement() as PipeType;
            Level level = new FilteredElementCollector(document).OfClass(typeof(Level)).First() as Level;
            FilteredElementCollector sysCollector = new FilteredElementCollector(document);
            sysCollector.OfClass(typeof(PipingSystemType));
            ElementId pipeSysTypeId = sysCollector.FirstElementId();
            bool flag = true;

            // 1-2) 변수선언
            Pipe newpipe = null;
            XYZ start = null;
            XYZ end = null;

            // 1-3) geometryElements 생성하기
            List<GeometryElement> geometryElements = new List<GeometryElement>();

            foreach (Element element in elementlist)
            {
                GeometryElement geometry = element.get_Geometry(new Options());
                geometryElements.Add(geometry);
            }

            // 1-4) 트랜젝션 실행
            using (Transaction trans = new Transaction(document))
            {
                try
                {
                    trans.Start("Create pipe");

                    // 1-5) 파이프 생성 후 리스트에 담기
                    List<Line> lines = new List<Line>();
                    List<Pipe> pipes = new List<Pipe>();
                    List<Element> elePipe = new List<Element>();
                    foreach (GeometryElement geometryele in geometryElements)
                    {
                        foreach (GeometryObject obj in geometryele)
                        {
                            Line line = obj as Line;

                            lines.Add(line);


                            start = line.GetEndPoint(0);
                            end = line.GetEndPoint(1);
                            if (pipeType != null)
                            {

                                newpipe = Pipe.Create(document, pipeSysTypeId, pipeType.Id, level.Id, start, end);
                                pipes.Add(newpipe);

                                Element element = document.GetElement(newpipe.Id as ElementId);
                                elePipe.Add(element);

                                // 1-6) fitting 할 elbow 굵기에 맞게 pipe 굵기 설정하기
                                ElementId elementId = newpipe.Id as ElementId;
                                Parameter parameter = element.LookupParameter("Diameter");
                                parameter.Set(10 * 0.007333);

                                // 1-7) Pipe 의 연결할 elbow Type 지정하기
                                // Revit api 로 pipe fitting 할 경우 연결할 elbowType의 기본값이 none이기 때문에 꼭! Routing Preferences에서 설정해주어야한다.
                                ElementType elbowType = new FilteredElementCollector(document).OfCategory(BuiltInCategory.OST_PipeFitting).OfClass(typeof(ElementType)).Cast<ElementType>().Where(x => x.FamilyName.Contains("M_Elbow")).FirstOrDefault();
                                RoutingPreferenceManager rpm = newpipe.PipeType.RoutingPreferenceManager;
                                rpm.AddRule(RoutingPreferenceRuleGroupType.Elbows, new RoutingPreferenceRule(elbowType.Id, "Set Elbow fitting Type"));
                                int routingPerenceGroupCnt = rpm.GetNumberOfRules(RoutingPreferenceRuleGroupType.Elbows);
                                if (routingPerenceGroupCnt > 1)
                                {
                                    for (int k = 0; k < routingPerenceGroupCnt - 1; k++)
                                    {
                                        rpm.RemoveRule(RoutingPreferenceRuleGroupType.Elbows, 0);
                                    }
                                }
                            }
                        }
                    }

                    // (2) Pipe 연결시키기 

                    // 2-1) transaction 안에서 종류 설정했으므로 중간에 새로고침하여 elbow 종류 설정한 값 적용되도록 하기 
                    document.Regenerate();
                    // 2-2) 연결시킬 2개의 파이프 connector 가져오기위해, connectormanager로 connectors 뽑아내기

                    for (int i = 0; i < pipes.Count() - 1; i++)
                    {

                        ConnectorManager pipe_connectorManager1 = pipes[i].ConnectorManager;
                        ConnectorSet pipe_connectorSet1 = pipe_connectorManager1.Connectors;
                        ConnectorManager pipe_connectorManager2 = pipes[i + 1].ConnectorManager;
                        ConnectorSet pipe_connectorSet2 = pipe_connectorManager2.Connectors;


                        // 2-3) 파이프가 가지고 있는 connectors 에서 연결시킬 connector 뽑아내기

                        Connector pipe_connector1 = null;
                        Connector pipe_connector2 = null;
                        double minDist = double.MaxValue;
                        foreach (Connector connector1 in pipe_connectorSet1)
                        {
                            foreach (Connector connector2 in pipe_connectorSet2)
                            {
                                double d = connector1.Origin.DistanceTo(connector2.Origin);
                                if (d < minDist)
                                {
                                    pipe_connector1 = connector1;
                                    pipe_connector2 = connector2;
                                    minDist = d;
                                }
                            }
                        }

                        // 2-4) 2개의 파이프 연결시키기
                        FamilyInstance fitting = document.Create.NewElbowFitting(pipe_connector1, pipe_connector2);
                    }

                    // (3) pipe와 겹치는 line 삭제하기
                    foreach (Element element in elementlist)
                    {
                        ElementId elementId = element.Id;
                        document.Delete(elementId);
                    }

                    trans.Commit();
                }
                catch (Exception ex)
                {
                    MessageBox.Show("Pipe 간의 각도가 너무 크거나 작습니다. \n조정 후 다시 시도해주세요");
                    trans.RollBack();
                }

            }
        }


 [ 주의할점 ]


Revit api 를 활용하여 Pipe Fitting을 할 경우 Pipe 끼리 이어질 Elbow 의 기본값이 None 으로 지정된다.

따라서, Pipe 생성후 Routing Preferences 에서 어떤 Elbow와 Fitting시킬 것인지 RoutingPreferenceManager api 를 이용하여 elbowType 을 지정해준다.

반응형


Revit api 를 활용해 Model Line 선택 후 자동으로 바닥 그리는 방법


1 ) 선택한 개체를 필터링할 수 있는 인터페이스  구현

public class PlanarFacesSelectionFilter : ISelectionFilter
{
    Document doc = null;
    public PlanarFacesSelectionFilter(Document document)
    {
        doc = document;
    }

    public bool AllowElement(Element element)
    {
        return true;
    }

    public bool AllowReference(Reference refer, XYZ point)
    {
        if (doc.GetElement(refer).GetGeometryObjectFromReference(refer) is PlanarFace)
        {
            return true; // Only return true for planar faces. Non-planar faces will not be selectable
        }
        return false;
    }
}

2 ) 바닥 생성하기

public void CreateFloor(Document document, UIDocument uidoc)
{
    //1) 바닥을 생성하기 위한 세부사항들을 가져온다.
    //1-1) 바닥을 생성하기 위한 floor type 을 가져온다.(floortype 종류 첫번째 것을 임의로 가져온다.)
    FloorType floorType = new FilteredElementCollector(document).OfClass(typeof(FloorType)).FirstElement() as FloorType;

    //1-2) 바닥을 생성하기 위한 level 을 가져온다. (level 종류 첫번째 것을 임의로 가져온다.)
    Level level = new FilteredElementCollector(document).OfClass(typeof(Level)).FirstElement() as Level;

    //1-3) Z 축은 기본 (0,0,1) 로 고정한다.
    XYZ normal = XYZ.BasisZ;

    // 2) 선택한 선분 가져오기
    // 2-1) 프로젝트 상에서 내가 선택한 modelline 가져온다.
    ISelectionFilter selFilter = new PlanarFacesSelectionFilter(document);
    IList<Reference> references = uidoc.Selection.PickObjects(ObjectType.Element, selFilter, "Select multiple planar faces");
    List<Element> elementlist = new List<Element>();

    // 2-2) 선택한 line을 바탕으로 바닥을 그리기 위한 형변환 
    CurveArray profile = new CurveArray();
    List<GeometryElement> geometryElements = new List<GeometryElement>();

    foreach (Reference referen in references)
    {
        Element element = uidoc.Document.GetElement(referen);
        elementlist.Add(element);
        GeometryElement geometry = element.get_Geometry(new Options());
        geometryElements.Add(geometry);
    }

    //2-3) 생성할 바닥 line 을 append 함수로 CurveArray에 담는다.
    foreach (GeometryElement geometryele in geometryElements)
    {
        foreach (GeometryObject obj in geometryele)
        {
            if (obj is Curve)
            {
                profile.Append(obj as Curve);
            }
        }
    }

    // 3) transaction 열어 바닥 추가한다.
    Transaction trans = new Transaction(document);
    trans.Start("Create Floors");
    document.Create.NewFloor(profile, floorType, level, true, normal);
    trans.Commit();

}


line 그리기
자동으로 바닥 그려지고 난 후 모습

반응형

오류원인: 


null 의 값을 가질 수 없는 object 에 null을 할당했기 때문에 생긴다.


해결방법 : 


오류가 난 객체에 null 값이 할당되지 않도록 코드를 수정한다.


1) 기존코드 : 선언과 null 할당을 한다. 
2) 해결코드 : new 연산자를 통해 변수만 생성 후 null 을 할당하지 않는다. 


참고사이트 : 

https://docs.unity3d.com/kr/530/Manual/NullReferenceException.html

반응형

들여올 excel 파일
들여오기 button 클릭 전
들여오기 button 클릭 후


[ 방법 ]

1단계 .  들여올 excel 파일 경로 불러오기

2단계 . 가져온 excel 파일 열기

3단계 . excel 파일 안의 원하는 Sheet 에 접근

4단계 . 엑셀의 데이터들을 모델(model)에 담은 후 리스트(list)에 추가하기

5단계 . List에 담겨진 데이터를 Datagrid 에 binding하기


[ 소스코드 ]


xaml

        <DataGrid x:Name="Datagrid_Import" Grid.Row="1" Grid.ColumnSpan="5" Height="auto" Width="auto" AutoGenerateColumns="False" ItemsSource="{Binding ObserList}" CanUserAddRows = "False" >
                <DataGrid.Resources>
                    <Style TargetType="{x:Type DataGridColumnHeader}">
                        <Setter Property="Background" Value="#464646"/>
                        <Setter Property="FontWeight" Value="SemiBold" />
                        <Setter Property="BorderThickness" Value="0,0,1,2"/>
                        <Setter Property="BorderBrush" Value="Black"/>
                        <Setter Property="Foreground" Value="White" />
                        <Setter Property="HorizontalContentAlignment" Value="Center"/>
                    </Style>
                </DataGrid.Resources>
                <DataGrid.CellStyle>
                    <Style TargetType="DataGridCell">
                        <Setter Property="TextBlock.TextAlignment" Value="Center"/>
                        <Setter Property="IsEditing" Value="true" />
                    </Style>
                </DataGrid.CellStyle>

            <DataGrid.Columns>
                <DataGridTextColumn Header="이름" Width="1.5*" Binding="{Binding ProductName}" IsReadOnly="True"/>
                <DataGridTextColumn Header="수량" Width="*" Binding="{Binding Stock}" IsReadOnly="True"/>
                <DataGridTextColumn Header="제조사" Width="1.5*" Binding="{Binding Manufacture}" IsReadOnly="True"/>
                <DataGridTextColumn Header="입고날짜" Width="2*" Binding="{Binding InputDate, StringFormat = {}{0:yyyy-MM-dd}}" IsReadOnly="True"/>
                <DataGridTextColumn Header="유통기한" Width="2*" Binding="{Binding ExpirationDate, StringFormat = {}{0:yyyy-MM-dd}}" IsReadOnly="True"/>
                <DataGridTextColumn Header="남은기간" Width="1.5*" Binding="{Binding RemainingDate}" IsReadOnly="True"/>
                <DataGridTextColumn Header="관리자" Width="1.5*" Binding="{Binding ManagerNum,Converter={StaticResource ManagerNameConver}}" IsReadOnly="True"/>
                </DataGrid.Columns>
            </DataGrid>        

        <!-- 하단 Export 버튼-->
        <Button x:Name="btn_Import" Grid.Row="2" Grid.Column="4"  Margin="10" Content="들여오기"  Width="95" Height="40"  Background="Gray" HorizontalAlignment="Left" FontWeight="ExtraBold" Foreground="White" Click="Btn_Import_Click"/>

            <!-- 검색창-->
            <StackPanel Grid.ColumnSpan="5" Grid.Row="0" Orientation="Horizontal"  HorizontalAlignment="Center" >
            <Label Width="75" Height="40" Content="파일 이름"  FontSize="15" HorizontalContentAlignment="Center"  VerticalContentAlignment="Center"/>
            <TextBox x:Name="textbox_FileSearch" Width="500" Height="30" TextWrapping="Wrap" VerticalContentAlignment="Center" />
            <Button x:Name ="btn_FileSearch" Content="파일찾기" Height="30" Width="75" Margin="10" FontWeight="ExtraBold" Click="Btn_FileSearch_Click"  />
            </StackPanel>

xaml.cs

        private void Btn_Import_Click(object sender, RoutedEventArgs e)
        {
            // 파일 경로 불러오기
            var fi = new FileInfo(this.textbox_FileSearch.Text);

            //가져온 파일 열기
            using (var package = new ExcelPackage(fi))
            {
                var workbook = package.Workbook;

                //Excel 안의 AllSheet에 접근
                var worksheet = workbook.Worksheets.FirstOrDefault();

                // 시트의 마지막 Row 데이터에서 1빼기
                int noOfRow = worksheet.Dimension.End.Row - 1;

                // 종류 row를 제외하고 2부터 시작하기
                int row = 2;
                List<mProduct> excelData = new List<mProduct>();
                for (int k = 0; k <= noOfRow - 1; k++)
                {
                    mProduct item = new mProduct();
                    item.ProductNumber = Convert.ToInt32(worksheet.GetValue(row, 1));
                    item.ProductName = worksheet.GetValue(row, 2).ToString();
                    item.Stock = Convert.ToInt32(worksheet.GetValue(row, 3));
                    item.Manufacture = worksheet.GetValue(row, 4).ToString();
                    item.InputDate = Convert.ToDateTime(worksheet.GetValue(row, 5).ToString());
                    item.ExpirationDate = Convert.ToDateTime(worksheet.GetValue(row, 6).ToString());
                    item.RemainingDate = Convert.ToInt32(worksheet.GetValue(row, 7));
                    item.ManagerNum = Convert.ToInt32(worksheet.GetValue(row, 8));
                    row++;
                    excelData.Add(item);

                    // productNumber가 0인 시점에서 데이터 불러오는 작업 중단하기
                    if (Convert.ToInt32(worksheet.GetValue(row, 1)) == 0)
                    { break; }
                }
                this.Datagrid_Import.ItemsSource = excelData;
            }
        }


반응형


1단계) GitLab 에 생성한 프로젝트와 동일한 이름의 빈폴더를 만든다.


2단계)

현재 작업하고 있는 프로젝트의 탐색기 창 - 로컬 Git 리포지토리 새로만들기 클릭 - (gitlab 프로젝트와 동일한 이름의)빈폴더 경로 값 지정


3단계) .vs 파일을 제외한 나머지 파일 복사 - 빈폴더에 붙여넣기


(좌) 2단계 완료 시 빈폴더 들어가면 보이는 모습 (우) 작업하던 프로젝트 파일 붙여넣은 후 

4단계) 빈폴더에 복사/붙여넣은 프로젝트 열기 - 팀탐색기 - 리포지토리 설정 - 원격 추가버튼 클릭 - GitLab Clone 버튼 클릭시 Http 주소 복사 - (원격 추가시 뜨는 창의) 페치/푸시 경로에 붙여넣기


5단계) 푸시(push) 후 동기화 버튼 클릭


반응형

+ Recent posts